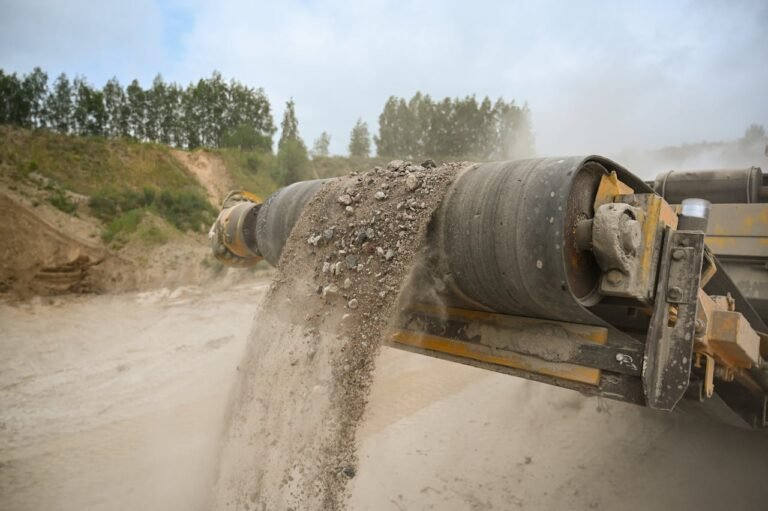
Belt Conveyor Misalignment: Causes and Adjustment Guide
- Introduction: Belt misalignment—neither a major nor a minor issue
- Part One: Why does the belt run off-centre?
- Part Two: Methods for Correcting Belt Misalignment – Are 15 Tips Enough?
- Method 1: Idler Roller Alignment Method
- Method 2: Gravity-based alignment method
- Method 3: Vertical Roller Alignment Method
- Method 4: Raising to Correct Misalignment
- Method 5: Idler Cleaning
- Method 6: Adjusting the Tensioning Device
- Method 7: Narrow Rubber Strip Alignment Method
- Method 8: Roller Alignment Method
- Method 9: Reducing Resistance
- Method 10: Material Flow Correction Method
- Method 11: Joint Correction Method
- Method 12: Support Frame Correction Method
- Method 13: Belt Repair Method
- Method 14: Idler Roller Adjustment Method
- Method 15: Tensioning Device Method
- Conclusion: Belt misalignment is not an unsolvable problem.
Introduction: Belt misalignment—neither a major nor a minor issue
Anyone who has worked on a conveyor belt has encountered belt misalignment. When the belt runs crookedly, the rubber on the edges wears down to nothing; over time, it can tear, become damaged, or even lead to accidents.
To be honest, the issue of belt misalignment can be both complex and simple. It essentially boils down to a few things: misaligned drums, crooked idlers, improperly positioned material, or a slack belt. The difficulty lies in identifying the exact cause and then applying the right solution.
In this article, I’ll break down the causes of belt misalignment one by one and list the adjustment methods accordingly. Some of these methods I’ve tried and found effective myself, whilst others were taught to me by seasoned veterans. I hope you find this useful.
Part One: Why does the belt run off-centre?
The causes of misalignment can be summarised into three main categories: equipment manufacturing quality, conveyor belt quality, and installation quality.
It goes without saying that you must exercise due diligence when selecting equipment. Today, I’ll focus on several common issues that arise during the installation phase.
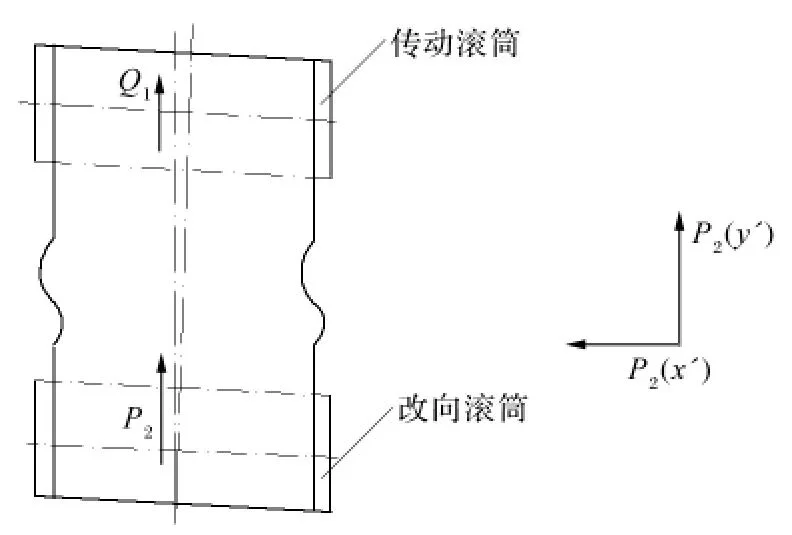
1.1 Drive and idler drums not perpendicular
If the drum axes are not perpendicular to the conveyor’s centreline, the direction of the friction force exerted by the drums will be skewed.
To illustrate: the friction force Q1 from the drive drum is intended to pull the conveyor belt forward, but if the drum is misaligned, the direction of Q1 is also skewed to the right. The result is that the conveyor belt drifts to the right.
By the same token, problems can arise at the return drum. The force P2 exerted by the conveyor belt on the drum can be broken down into a component that causes the drum to rotate and a component that pulls the conveyor belt sideways. If both drums are misaligned, the deviation becomes even more pronounced.
What can be done? Adjust the position of the drum to align it correctly.
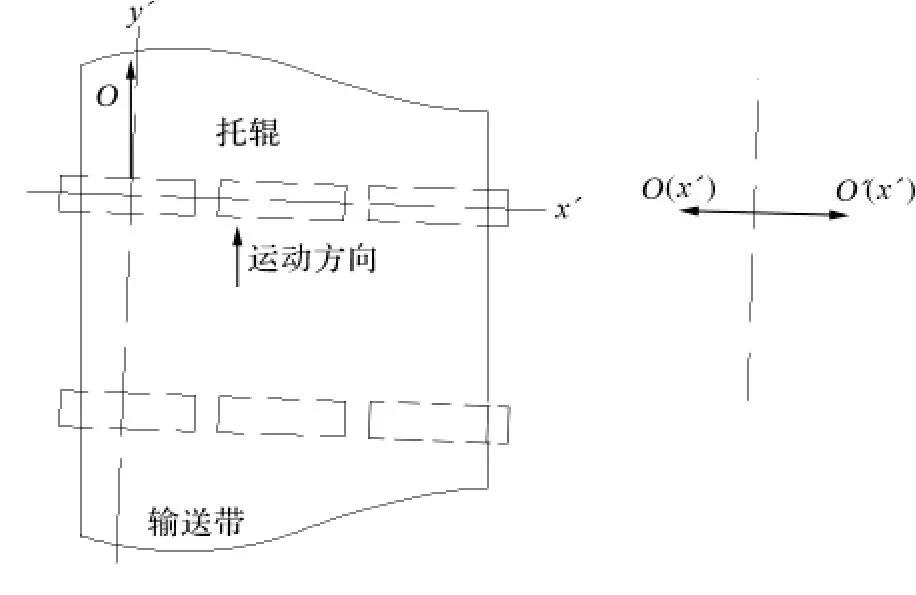
1.2 Idler roller axes not perpendicular
If the axes of the idler rollers are not perpendicular to the centreline of the conveyor, this can also cause the belt to run off-centre. The principle is similar to that of the drive drum: the frictional force O exerted by the conveyor belt on the idler roller acts in the direction of the belt. If the idler roller is misaligned, this force is split: one component causes the idler roller to rotate, whilst the ‘reaction force’ of the other component pushes the conveyor belt to the side.
What can be done? Adjust the idler roller axis to ensure it is vertical.
1.3 Incorrectly installed feed chute
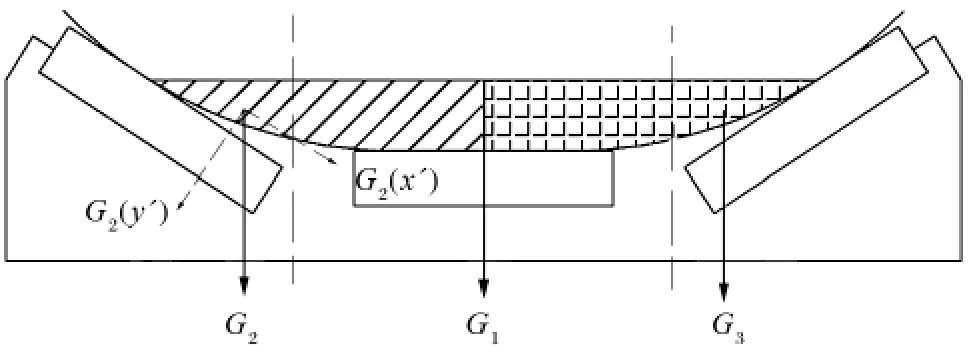
Material falling from the feed chute should be evenly distributed across the conveyor belt. If the feed chute is installed at an angle, the material will pile up on one side, resulting in uneven stress on the belt.
In physical terms: the material is divided into three components, G1, G2 and G3. When material is present only on the left, the component force G2(x′) pulls the conveyor belt towards the centre, causing the belt to drift to the right instead.
What to do? Align the feed chute correctly, or install baffles within the chute to ensure the discharge point returns to the centre.
1.4 Drift caused by vibration
Some vibration is inevitable when the equipment is started up. The greater the vibration, the more the belt drifts off course. Of all types of vibration, the radial runout of the idlers has the greatest impact on belt deviation.
1.5 Belt Ageing and Damage
After prolonged use, the rubber on the edges of the belt wears thin, and in some cases, the underlying canvas may even become exposed. At this stage, the tension on both sides of the belt is uneven, causing it to naturally drift towards the looser side.
Part Two: Methods for Correcting Belt Misalignment – Are 15 Tips Enough?
The following methods are those I have compiled over the years. Each method has its own specific application and should not be used indiscriminately. I have created a table for you to have a quick look at:
Method Application Difficulty
Idler roller adjustment General, most commonly used Low
Gravity adjustment Misalignment under heavy load Low
Vertical roller adjustment Constant drift to one side Medium
Raising Method Drift to one side under no-load conditions Low
Idler Cleaning Method Drift at a specific fixed point Low
Adjusting the Tensioning Device Erratic drift left and right Low
Narrow Belt Alignment Method Drift at the head or tail Medium
Drum Alignment Method Drift at the drum Medium
Reducing Resistance Method Minor drift Low
Material Flow Correction Method Deviation under heavy load, normal under no load Medium
Joint Correction Method Deviation at the joint High
Support Frame Correction Method Severe deviation at a specific location Medium
Belt Repair Method Edge wear Medium
Idler Roller Alignment Method Deviation to one side under no load Low
Tensioning Device Method Uneven tension on both sides Low
Let’s go through them one by one.
Method 1: Idler Roller Alignment Method
This is the most commonly used method. When applying it, remember these three mnemonic phrases:
“It drifts towards the slack, not the tight” — When the front and rear drums are not parallel, the belt drifts towards the slack side.
“It drifts towards the high, not the low” — When one end of the idler roller is higher than the other, the belt drifts towards the higher end.
“It drifts to the rear, not the front” — When the idlers are positioned one in front of the other, the belt drifts towards the rear end.
Once you’ve memorised these three mnemonic phrases, you won’t have to guess when adjusting the idlers.
Method 2: Gravity-based alignment method
If the belt drifts under heavy load, you can slightly raise the drum and idler bracket on the side where the belt is drifting. The weight of the material itself will generate a component force that pulls the belt back into alignment.
Method 3: Vertical Roller Alignment Method
If the belt consistently drifts to one side, install a vertical roller on the side where the drift occurs. The vertical roller serves two purposes: firstly, it pushes the belt back directly; secondly, it reduces the linear velocity on the drifting side through friction, causing the belt to shift towards the opposite side.
Method 4: Raising to Correct Misalignment
If the belt drifts to one side when unloaded, utilise the principle that ‘it drifts higher, not lower’—raise the idler bracket on the opposite side, starting with the first one and gradually lowering the subsequent ones; the misalignment will then disappear.
Method 5: Idler Cleaning
If the belt drifts at a specific fixed point, inspect the idlers at that point. Have they stopped rotating? Is it caked with mud? Has the idler fallen off? Clean it if necessary, or replace it if required.
Method 6: Adjusting the Tensioning Device
If the belt wanders erratically from side to side with no fixed direction, it is most likely due to the belt being loose. Tighten the tensioning device slightly, and the misalignment will disappear.
Method 7: Narrow Rubber Strip Alignment Method
I personally find this method rather ingenious.
Principle: The linear velocity of the belt on the roller is v = ωR (where ω is the rotational speed of the roller and R is the radius of the roller). If you wedge a narrow strip of tape beneath the roller on the side where the belt is running off-centre, the radius of that side of the roller increases, and so does the linear velocity. As the off-centre side moves faster, the belt will shift towards the other side.
Procedure: Insert a 200mm × 200mm strip of narrow rubber between the roller and the belt, allowing it to rotate with the roller. Once the belt has returned to its correct position, remove the strip.
Method 8: Roller Alignment Method
If the belt drifts at the roller, this indicates a problem with the roller itself—either it is moving horizontally, material has adhered to it causing the diameter to become non-circular, or there is an installation error. Simply correct the drum’s level and parallel alignment.
Method 9: Reducing Resistance
If the misalignment is minor, clean the idler roller on the affected side and apply a few drops of machine oil to the bearing to ensure it rotates smoothly. Once this side rotates faster, the belt will realign.
Method 10: Material Flow Correction Method
No deviation when empty, but deviation occurs as soon as material is loaded – this is a classic sign of an incorrect discharge point. Adjust the hopper, or install a guide plate to redirect the material flow.
Method 11: Joint Correction Method
The deviation position is not fixed, but the greatest deviation always occurs when the joint is passed – this indicates the joint has not been properly aligned. Re-make the joint.
Method 12: Support Frame Correction Method
If the belt consistently drifts at the same location and the drift is severe, check whether the idler support frame or the main frame is warped. Level and straighten it, or replace it.
Method 13: Belt Repair Method
If the belt edges are severely worn, causing uneven tension on both sides and an unpredictable drift location, repair where necessary or replace the belt.
Method 14: Idler Roller Adjustment Method
If the belt consistently drifts to one side when unloaded, remove three of the fixing bolts from the idler roller bracket on the side where the drift occurs, leaving just one to act as a pivot. Then rotate the bracket through an angle in the direction of or against the belt’s travel before securing it in place. This effectively creates a temporary ‘grooved alignment idler roller’.
Method 15: Tensioning Device Method
If the belt drifts to the same side under both no-load and loaded conditions — this indicates uneven tension on both sides. Adjust the lead screw or counterweight tensioning device at the drum to tighten the slack side.
Conclusion: Belt misalignment is not an unsolvable problem.
When it comes to belt misalignment, no matter how much we discuss it, it ultimately boils down to identifying the cause and addressing it directly.
If the drum is out of plumb, realign it.
If the idler is crooked, adjust it.
If the feed is uneven, modify the chute.
If the belt is slack, tighten it.
If the splice is crooked, redo it.
The hardest part isn’t the repair itself, but identifying the root cause. We hope the 15 methods and cause analyses summarised in this article will help you avoid unnecessary detours.
Data Sources
Force analysis of drums and idlers — based on the fundamental principles of Newtonian mechanics and engineering mechanics
Belt linear velocity formula v = ωR — a basic formula for circular motion
The mnemonic “Run high, not low; run back, not forward; run tight, not loose” — a summary of industry-wide experience, widely circulated among on-site maintenance personnel
15 methods for belt alignment — compiled from Practical Technology of Belt Conveyors, Mining Machinery Maintenance Manual and on-site experience